
Add Data for a New District Term
When a new district term begins, new data (e.g. new users and class rosters) needs to be added to Benchmark Universe for the upcoming school year. How this occurs depends on which rostering method the district chose to use for data sharing with Benchmark Universe.
Data Syncs – Districts that share data via Clever, ClassLink, or GG4L can release their data sync using the instructions below.
CSV – Use Benchmark’s CSV file templates to build the data set and import the new data into Tech Admin. Automation using SFTP is available.
Manual – Typically used by smaller districts, user records and class rosters can be created manually in Tech Admin.
LTI – There are some limitations in using LTI as a rostering method, but if your users are rostered through an LTI launch nothing has to be done for the new year. New user accounts and new classes will be created ‘on the fly’ as teachers launch into Benchmark Universe.

|
Due to the LTI rostering limitations, Benchmark’s recommendation is to use one of our other supported rostering methods. Benchmark can still offer an LTI integration in conjunction with other rostering methods which allows users additional ways to access Benchmark Universe and enjoy features such as assignment deep linking and grade pass back to the LMS. |
Sync Initial Data Load
District Administrators are able to release their district’s initial data sync for the new school year. This is a one-time sync release.
|
|
This feature only applies to districts that sync rostering data to Benchmark Universe via Clever, ClassLink, or GG4L. The button is visible when the data sync is in a paused state and has not been released yet for the new term. |
After this initial data release the sync will automatically run nightly. Administrators tasked with managing rosters are also able to run a data sync or force sync specific users or classes, as needed.
Tech Admin can be accessed using your District Admin credentials or Benchmark Universe passthrough.
- Access the District Terms tab in Tech Admin and create a new district term for the upcoming school year.

- On or after the new term’s start date, return to the District Terms tab. Observe the Run Initial Data Sync button is now visible.
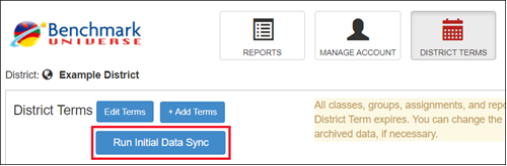
- Click Run Initial Data Sync.
- Read the information provided asking to verify that you are the authorized administrator for managing the data source, and that sharing rules and/or filters have been applied for the upcoming school year’s data.
- Click Cancel to make changes to the data source before releasing the sync. Click Continue to move to the next screen.
- Next, verify the amount for each entity (teachers, students, classes, etc.) that are being shared on the API appears accurate.
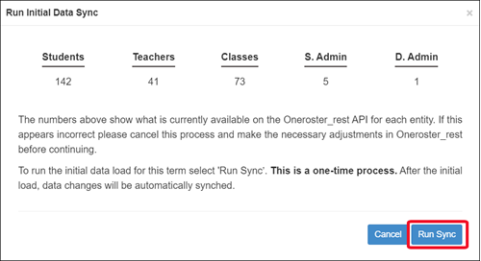
- Click Cancel to make changes to the data source before releasing the sync. Click Run Sync to start the sync process.
The data sync has now been released. The last message informs you to check Tech Admin the following day to verify that the data available for the upcoming school year has been added.
Sync results can be viewed on the Onboarding application’s Sync Results page. If you do not see the Sync Results button on the Tech Admin homepage you may need to opt in for this feature, please use the Contact Us button at the bottom right to submit a ticket to our Technical Success team.